The wheel bearings in your vehicle and camper trailer have the responsibility of carrying the majority of the weight of the vehicle and trailer, which means they need to be in the best possible condition before any large trips are undertaken. I touched on wheel bearings in a previous article, but today we will have a look at reasons why wheel bearings fail and what you can do to get out of trouble if you encounter problems along the way.
There are two main types of wheel bearings used in 4WDs and trailers: tapered and sealed bearings. In a tapered setup, there is an inner and outer bearing, with the outer normally being smaller than the inner. It is lubricated with high temperature grease and a thrust washer and nut are used to tension it to the proper pre-load. Tapered bearing are found in trailers and some 4WDs like Toyotas (70, 80 and 100 series) and Nissan Patrols, and they are serviceable.
Sealed bearings last a lot longer than tapered bearings but are not serviceable and are lot more expensive. These bearings are normally pressed on and off using a workshop press, so if one of them fails in the bush there isn't much that can be done except call a tow truck.


Wheel bearings fail for a few reasons, such as excessive load, poor maintenance or a failure to replace them. When loading the camper and vehicle for a long trip it is very easy to exceed the maximum load the vehicle or trailer can carry, and this can push the bearings passed their designed load capacity, causing them to fail.
Tapered wheel bearings require grease and to be done up to the right tension to function properly, and as they wear it will need to be re-greased and re-tensioned to compensate for the normal wear. If the bearings are not maintained properly then heat can build up, causing the bearings to fail and sometimes even welding them to the stub axle.
Sealed bearing units should be replaced as per the maintenance schedule outlined by the manufacturer. It is wise to get them inspected before any long trips and have them replaced if there is any question about their condition, even if it not scheduled to be done.
If you do find yourself with a wheel bearing issue, knowing how to change and set up your tapered wheel bearings is essential. If you are unsure about doing a job like this, ask a mate to show you how to do it, because it can be a daunting job. But if you know how to do it then you could one day get yourself out of trouble without too much fuss. Here is the procedure:
- You will need are a spare set of bearings, high temp grease, hammer, pair of pliers, a rag and a big shifter.
- Jack up the vehicle or trailer, ensure it's stable and then remove the wheel.
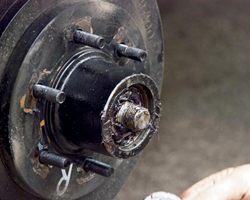
- With the wheel removed, the hub and brakes are exposed.
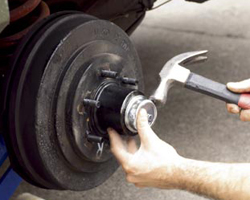
- Remove the dust cap with a gentle tap of the hammer, exposing the nut, split pin and washer.
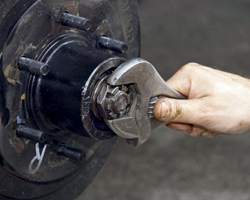
- Remove the split pin, undo the nut and remove the washer and outer bearing.
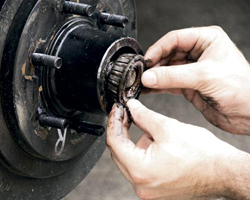
- Remove the hub (and brake drum if this is part of the wheel), then remove the rear seal from the back of the hub so the inner bearing can come out.
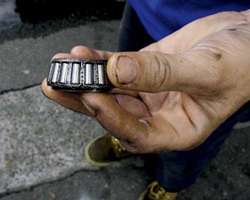
- Wipe both bearing with a rag and inspect them; you are looking for loose bits of metal and a burnt colour (this is a sign that the grease is not doing its job). If something has gone wrong, when you remove the hub there will be bits of bearing all over the place. If the bearing has fused to the stub axle, you will need a hammer and cold chisel to knock it off.
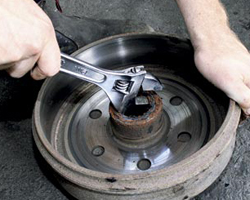
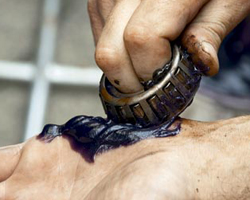
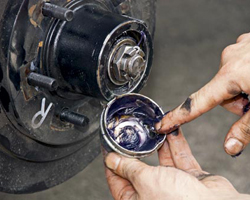
- If installing a new set of bearings, the bearing race will need to be removed from the hub and the new set installed. This can be done with a punch and a hammer, the bearing race is evenly tapped out of the hub and shouldn't be too difficult remove. Installation is the reverse, just making sure that both bearing races are all the way in position. The bearings will need to be greased before installation. Basically, you need to force the grease into and around the internals of the bearing. This can be done any way you like, as long as the bearing is full of grease. Coating the stub axle and inside of the hub with grease is also good practice.
- Install the bearing, mount on the spindle and refit the washer and nut.
- To adjust the pre-load do up the night firmly and rotate the brake drum so the grease can work its way around the bearings and hub. Continue doing this while loosening and tightening the nut. Using a big shifter, tighten the nut with just the weight of the shifter, this is the bearing's zero pre-load. Tighten the bearing a quarter turn from here.
- Wipe off the excess grease and replace the split pin, curling it over to ensure it doesn't come out (if you don't have a spare, wire can be used as a substitute).
- Grease the inside of the dust cover and replace. Replace the wheel and check for play, if there isn't any then it's been done correctly. If there is some play, tighten the nut up until the play goes away.
Safety should be your top priority when working on a vehicle, so make sure the 4WD or trailer is stable before working anywhere near it. Remember, keep it real and enjoy yourself.