Forget the bucket and plunger. Forget the barrel and hand crank. If you want to wash your clothes at camp, I’ve come up with the ultimate home-made washing machine.
Okay, ‘ultimate’ is a stretch. But the ‘home-made’ part is definitely true. And it looks it, too. You’re right: it’s not the prettiest piece of gear I pack when I go camping but it works.
The thing is, my kids are the best at getting their clothes filthy. We could be parked up on concrete as far as the eye can see and they’ll come back looking like chimney sweeps. So the challenge was set: build a portable washing machine out of the bits and pieces in my shed and, if I wanted to get a little bit fancy, spend no more than $30.


The old ‘bucket and plunger’ washing machine is known to work well enough but it requires a certain amount of manual labour. Being a closet lazybones, I’d rather be on my camp chair than bent over a bucket agitating clothes. Besides, I have a 100Ah deep-cycle battery in the back of my 4WD that’s charged by a 120W solar panel on the roof rack. So I might as well use it, I thought.
THE DIY MAGIC, AS IT HAPPENED
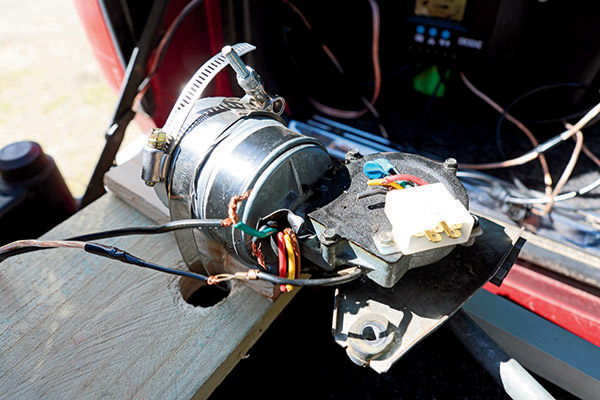
This washing machine uses an old windscreen wiper motor from a Commodore, which I fitted on to a frame, but I don’t see why you couldn’t use almost any other variety. I picked one up from a nearby wrecker for $15.
Be sure to get the windscreen wiper motor first, though, and build the frame according to the length of the motor’s arm. You’ll want it to reach and move a turntable base on the opposite side of the frame so it can agigate clothes inside a bucket.
I made my frame from offcuts of aluminium tubing that click together with nylon joiners. I cut a rectangle from a piece of timber and fixed it to the aluminium tubing with wing nuts so I can disassemble it for storage.
I secured the windscreen wiper motor to the timber using an automotive hose clamp and wing-nutted another piece of timber to the other end of the frame. This became the base for the lazy Susan turntable, on which the washing machine’s bucket sits. A lazy Susan bearing isn’t the sort of thing I keep in my shed, so I had to visit a bearing shop and open the wallet. Ten bucks.
The bearing was screwed directly to the base but access to the screw holes for the part of the bearing that fixes to the turntable was limited; therefore, I secured the turntable to the bearing with a healthy dose of Selleys Liquid Nails.
I drilled a hole through the corner of the turntable for the motor’s arm to attach, and secured the arm with an appropriately-sized hose clamp.
Next, I had to think of a way to keep the bucket on the turntable when the motor is turned on, lest it rattles off and spills water and washing all over our campsite. I traced the bottom of the bucket on the turntable, and on the outside edge of my pencil marks, I screwed 10x10mm blocks of pine, which ‘lock’ the bucket into position.
WIRING THE WASHER
The solar panel system of my vehicle’s secondary battery has a regulator, to which I can connect the washing machine when I want to use it, drawing its power from the battery. My cheap and cheerful wiring harness involves two wires, a positive and negative. I couldn’t tell you the diameter of the wire I used. Not too thick, not too thin. The wire was floating around, I used it, and it works. Which is good enough for this job, I reckon.
It is a good idea to run the positive wire through a switch, as once connected to the relevant wire of the windscreen wiper motor (the negative is simply earthed to the motor), the arm of the motor will immediately begin agitating the turntable and bucket. Wiring in a switch will avoid problems later.
Lastly, you’ll need some clothes to wash. Send the kids off to play with the other kids at camp, call them back an hour later, and you’re all set to show off your portable, electric, and rather whacky, washing machine.